Thursday, June 17, 2010

Boating!


Boating!

On Sunday June 13, 2010 we took our boat out for her maiden voyage of the year.

We have a 1974 21’ Spectra jet boat. It is purple and yellow. It’s cool. ;-)

We LOVE to take the boat out. I think that Chris and I both find the most relaxing place to be is on a nice, beautiful lake, chillin’ in our boat. I don’t know if there is anything more calming and soothing.

We have had this boat for about 6 years now, I think. We have taken this boat to a lot of different places. While living in Portland, our favorite place was actually in Washington. We would frequently take our boat to Lake Merwin, which is in the foothills of Mt. St Helens. It is a huge lake, and gorgeous! We will miss Lake Merwin!

We also would take the boat on the Willamette River, near downtown Portland or in Newberg. We have taken it out on Haag Lake outside of Hillsboro, Oregon, as well. We have taken the boat to Detroit Reservoir east of Salem and up to Black Lake in Tumwater, Washington. We try to get out on the boat as often as possible.

We don’t necessarily DO anything while we are out there, except relax and enjoy. We don’t ski, or board or tube, normally. We don’t normally fish, either. Although we have done all those things, typically going out on the boat is an opportunity for us to relax and enjoy each other’s company.

Well, and of course there is the added bonus of zooming around on the water in a cool boat with a big block Oldsmobile 455 motor in the back of it, too!


Our maiden voyage of 2010 was awesome! Chris had pulled the motor to do some maintenance and updates, so our maiden voyage was also a shakedown of sorts to make sure that all the maintenance was good and no leaks!


We took our boat to Emigrant Lake in Ashland, Oregon, which is about 30 minutes from our house. Emigrant Lake isn’t that big, and it is at the bottom of some big hillsides, so almost like a mountain lake.


The weather on Sunday was about 90 degrees, sunny and HOT! Perfect for boating. There was a nice breeze coming down off the hillsides, which kept us from melting. We also have a cool umbrella shade thing to keep the sun off of us when we get too hot.

And for those that are concerned, yes we wear sunscreen! SPF 50, hats, sunglasses and our umbrella shade all help us to stay safe and enjoy the sun and lake at the same time. We also wear our life jackets whenever we are under way. Safety First Kids!

We had an excellent day on the lake. No problems with the boat, motor, leaks, fires or anything like that. She started and ran great. The weather was awesome. We watched some kids jump off of the rocks into the lake, saw a few other jet boats, and just generally had a really relaxing and fun day.

We look forward to MANY more relaxing days on the water.

Upper Table Rock/Roxy Ann


Hiking!

I’ve never been much of a hiker before. I don’t mind walking and I don’t mind walking on trails and stuff, but what I do mind, is hiking on trails that have exposed sides. I get really nervous and am not very surefooted.

That’s putting it politely. Actually, I’m terribly clumsy; add to that the nervousness from sheer edge trails and we have a recipe for disaster!

So, while we lived in Portland, and throughout my life, I have been on various hikes. I have hiked up Beacon Rock east of Vancouver, Washington on the edge of the Columbia River, more than once. I have hiked up to the top of Multnomah Falls, once that I can remember for sure, but I’ve been to Multnomah Falls more than that, so it is likely I hiked it as a child as well. Chris and I did some hiking around Portland a couple of different times and places.

But it wasn’t until we moved to Southern Oregon that we have gone hiking multiple times in a short period of time. We have found a few places that are relatively close by, one is about 10 minutes from home, and another is about 20 minutes or so. There are several more that we hope to find time to check out this summer and fall as well.

About two weeks ago we went hiking on Upper Table Rock. This flat topped rock was created by lava flows about 7 million years ago. Upper Table Rock and its twin, Lower Table Rock, rise about 800’ above the valley floor. Up top they shift from rocky to grassy with seasonal ponds. I understand in the springtime they are quite pretty with all the different meadow wildflowers blooming.


Upper Table Rock meadow.

The hike to the top of Upper Table Rock is about a 740’ vertical climb. We forgot to check, but think it took us about an hour or so to reach the plateau. We were surprised that the trail, mostly gravel or hard packed dirt, was not muddy after the few days of rain we had experienced prior to our hike.

The weather had been sunny when we decided to go for the hike. As we got in the truck to head to the trailhead it sprinkled a little bit. We were very lucky though. Even though you can see the rain hitting the foothills of the south valley and even some of the south valley floor, we never got rain and in fact, it was quite sunny and warm up on the plateau.


The hike is pretty darn steep, with a significant climb in elevation. The bottom section starts off pretty steep, no nice gentle slope to get you started. In the middle, the trail flattens a bit, giving a false sense of ease. As we approach the plateau-summit, it gets pretty steep again, and also quite rocky. Throughout the trail, though, there are no significant edge drop-offs, so I am quite comfortable along the whole trail in that regard.


Looking off the side from the top.


Those are not bushes, those are the tops of trees!

The first time we hiked up this trail was last fall. I was out of shape and unprepared. It was BRUTAL! I was huffing and puffing and my legs were burning and I seriously wasn’t sure if I could make it. This time, I am much more in shape and prepared. I hiked to the top without much trouble. Of course, it was steep so I was breathing heavily, but I managed to keep up with Chris the entire way and thankfully, all the working out I’ve been doing paid off. My legs felt great and I had enough energy and power to keep going. When we got back to the truck I was pleasantly sore and tired, but not painfully so. It was a great hike!

Enjoy some photos of our view.


Roxy Ann Peak from Upper Table Rock (looking south)


Lower Table Rock to the west of Upper Table Rock
******************************************************************************


The next hike we went on was to the summit of Roxy Ann Peak.

Roxy Ann Peak is a small mountain located directly east of my house. When I look out my back windows or sit on my patio, I look at Roxy Ann.

Roxy Ann summit is at about the 3500’ level. My house is at about the 1500’ level. It takes us about 10 minutes to get to the gate where the hike starts on Roxy Ann.

The hike we did is basically up the west side of the mountain, curved around to the east side and then up to the summit. This is all a gravel road hike. The mountain does have several other single track style trails on it, but we have not attempted those yet.

The first time we went to Roxy Ann, Chris’ pager went off after about 15 minutes, so we had not gotten very far before we had to turn back. The second time we got quite a bit farther, but it was an after work hike, we still needed to have dinner and I had homework to do, so we cut it short as well.

This time, we went prepared. I packed us dinner of skinless breaded fried chicken and homemade coleslaw and plenty of water. Chris got home a few minutes early and we took the quick trip to get to Roxy Ann. This time, it was the summit or bust!

According to Wikipedia, Roxy Ann road is a 2.64 mile loop that goes all the way around the peak, and there are 6 trails that range in difficulty from moderate to steep. We did not do the entire loop, as on the east side of the mountain there is an additional road that heads up to the summit.


We hit the road at the upper gate and set off at a brisk pace on a sunny, although somewhat cool and breezy afternoon. The first ¾ of the hike has a nice, relatively gradual climb to it. It is a nice workout, but nothing terribly strenuous. As we wound our way up the road we came to a point where we were on the north side of the peak looking north. From there we could see the two table rocks off in the distance, where we had been hiking the weekend before! Cool!


After this point, we start curving around the east side of the mountain. All of a sudden the road becomes this ridiculously steep grade! Seriously, as soon as we started up this last ¼ of the hike, I immediately fell behind Chris by 5 or 6 paces. It was that steep! Up – Up – Up! Man oh man was I feeling the muscles in my glutes and thighs! I was sweatin’, my heart was pounding and I was huffin’ and puffin’! I actually had to stop a couple of different times to get some water and try to catch my breath a bit.

This is so much steeper than it looks! Truly!


We finally reached the summit! I was so excited! I was so thankful to not be climbing anymore! I did it! It only took us about 55 minutes (including a couple of photo stops) to reach the top!


Here are some of the incredible views:


Also, totally awesome, there is a picnic table at the summit, looking east to Mt. McLaughlin. This is where we ate our chicken dinner.


Beautiful!

We made the descent after our dinner in about 45 minutes. It was a gorgeous day, a great hike, and awesome workout and I am looking forward to doing it again soon!


Mt. McLaughlin

Food, Portions and a recipe!

Well, it’s been a little while since I posted anything! I have a handful of posts coming, probably in rapid succession, so be prepared!

In my blog title it says that Blurb Column is my place to share thoughts on life, ideas to improve our world, and reviews of places I go, things I do, and food I eat.

Well, I have done quite a bit about the food I eat, and not so much about the things I do or places I go. This post is about food, too, but there are a few coming that will be about some of the stuff that Chris and I have done lately. So, stay tuned for that!

*******************************************************************************************

Part of the reason I do this blog is for me, of course, because I enjoy writing and getting my thoughts and ideas out there. But, part of it is for the reader, as well. I have spent the last 4-5 years doing a LOT of learning about health, nutrition, meditation, wellness and balance. I am a work in progress and I learn more all the time. So, part of this is a way for me to share the things that I have found over the years that work, maybe some things that don’t, and especially a reminder that this life is supposed to be fun and fulfilling!

Part of a fun and fulfilling life, for me, is food. But one thing I want to point out: portions are important. I don’t think I have really talked about this much, but it came to my attention that I should talk about it. Particularly if people who read this are considering using these recipes in their own life to try and lose weight or are just health conscious. So let me tell you a couple of things about my food beliefs and then we’ll get to the recipes.

First of all, I don’t really believe in “bad” foods, as long as it is REAL food. Real food consists of whole, natural, unprocessed (or minimally processed), non-chemically created foods.

Examples:

Fresh Fruits-all of them
Fresh Vegetables-all of them
Whole Grains: Quinoa, Red Rice, Brown Rice, Couscous, Amaranth, Barley, and much more.
Fresh Meat: Fish, Poultry, Pork, Beef, Lamb
Legumes: lentils, kidney beans, black beans, garbanzo beans, and many more.

What I do not believe in is non-food. Non-food is stuff that comes in a package, packed with chemicals and ingredients that are unrecognizeable, unpronounceable and can be traced back to corn, soy and sugar.

I avoid these foods. I avoid convenience foods. I avoid added sugars. I avoid the center of the grocery store, where these foods are kept. Notice I say I avoid them. That doesn’t mean they never enter my diet, but it is rare and the exception to my overall plan.

I do eat some dairy, but I have an aversion to cow’s milk, so stick with rice milk when milk is called for and I limit my cheese to small portions, more as a way to season or finish a dish. I used to eat yogurt, but I find it to be so loaded with sugar, that I have mostly avoided that as well.

For many things, I try to buy local and organic. For the meat, I try to avoid major manufacturers because I don’t agree with their practices. I try to buy local or organic meat. For fish I NEVER buy farm raised fish. Just don’t do it! It doesn’t taste the same and they feed the fish colored food pellets to get their flesh to change colors, otherwise their flesh would be grey! YUCK.

These are things that I do. They may work for you or they may not. But I felt like people who read this blog should have a basis to draw from regarding my philosophy on food and eating.

Plus, I’m not perfect and I never intend to be. There will be times when I enjoy or choose to partake of a treat or convenience food. That is not bad either. That is life and there has to be balance.

Okay, so, back to my cooking and portion sizes. It is important to remember that if I make a rack of ribs I am not eating that entire rack of ribs! I would typically have one rib, possibly two at most. So, please remember that when you are reading through the recipes and thinking about trying them. It is important to remember what an appropriate portion size is for you, especially for more calorie dense foods, like meat and grains.

Okay, I’m going to cheat a little, because I did not take my own photo’s. I got a request for this recipe after I mentioned making it, so here it is:


This was our dinner last night. The recipe is from Cooking Light: Pan-Seared Shrimp and Arugula Risotto. It was quite tasty and creamy. If you have never made risotto before be prepared to stand at the stove for the 30+ minutes it takes to cook the rice, stirring constantly. The stirring is the key to the creamy consistency of the risotto.

Also, I did not use homemade chicken stock, though it is not difficult to make. I used Swanson’s low sodium chicken broth, which works just fine. Also, if you can’t find shallots, you can use regular onions.

A serving of this, according to Cooking Light, is 1 cup and equal to 344 calories. You can round this out with a side of green veggies, raw or steamed, or a nice green salad. If you do a salad be cautious with your dressing choice. Go for something light, like a nice homemade vinaigrette or a squeeze of lemon. Also, you could lower the overall calories a bit by reducing the butter/cheese amounts in the risotto. I didn’t, as I felt they were a good flavor addition.

After I eat something creamy and carb heavy like this I tend to feel like something sweet. A couple of ways to combat that are to drink some cold lemon water after you eat, or have an herbal tea with a slightly sweet flavor, like licorice root or orange zest.

Remember, portions sizes are important! You can eat many different types of real foods in your daily life, as long as you remember portions!

Here is a handy guide to appropriate portion sizes.

Tuesday, June 1, 2010

Memorial Day 2010

Memorial Day 2010

Memorial Day is a day to remember, honor and thank the past and present members of our armed services. These men and women sacrifice many things in order to protect our country and our rights. So, first of all I would like to say thank you to all those who have served.

But, we all know that Memorial Day is also the unofficial beginning of summer; a time for backyard barbeques and get-togethers with family and friends. Memorial Day gives us the opportunity to break out those delicious barbeque recipes. Some families roast a pig, others might do chicken, while others stick with the tried and true burgers and hotdogs. Chris and I like to break out the ribs for a good day long barbeque.

A few years ago I bought a cookbook called “How to Cook Meat” written by Chris Schlesinger & John Willoughby. I loaned the cookbook to my brother, who as I have mentioned before, is a good cook in his own right. My brother was the first to prepare this barbeque beef rib recipe, and it was such a hit, that I have made it two or three more times since. Now that may not seem like a ringing endorsement, but as you will see, the recipe is a little bit time intensive. Most of that time is unsupervised, but still, you have to do a bit of planning to make these ribs.

The rib recipe is called: Flintstones-Style BBQ Beef Ribs with Hot, Sweet, and Sour Bone Sauce. YUMMY!


Now, a couple of things I will mention before I get into all the details. First, as I said, this recipe is a bit time intensive. The ribs cook for about 5 hours in the oven on a low heat setting. While you don’t need to watch them every minute, you probably do want to plan on sticking around the house for most of that time. Second, the recipe calls for generous amounts of spices. It is a good idea to plan ahead a little bit with this recipe. If you want to make it this weekend, review the recipe and really look at how much spice is left in your jar of ground cumin. You may need to add something to your shopping list besides beef ribs.

First, the recipe, and then some thoughts.

For the Rub:

¼ Cup freshly cracked black pepper
2 Tablespoons brown sugar
2 Tablespoons paprika
2 Tablespoons ground cumin
2 Tablespoons kosher salt


5 -6 lbs of beef back ribs (about 2 racks)


For the Sauce:

1/3 Cup molasses
1 Cup ketchup
¼ Cup balsamic vinegar
¼ Cup fresh lime juice (about 2 limes)
½ Cup orange juice
¼ Cup soy sauce
2 Tablespoons lightly packed brown sugar
3 Tablespoons minced fresh ginger
3 Tablespoons minced fresh chile peppers of your choice (or to taste-these do have some kick!)
½ Cup thinly sliced scallions
Kosher salt and freshly cracked black pepper to taste

So that is the basic recipe. Here is what you do:

Take the rub ingredients and mix them together in a bowl. They should look something like this:


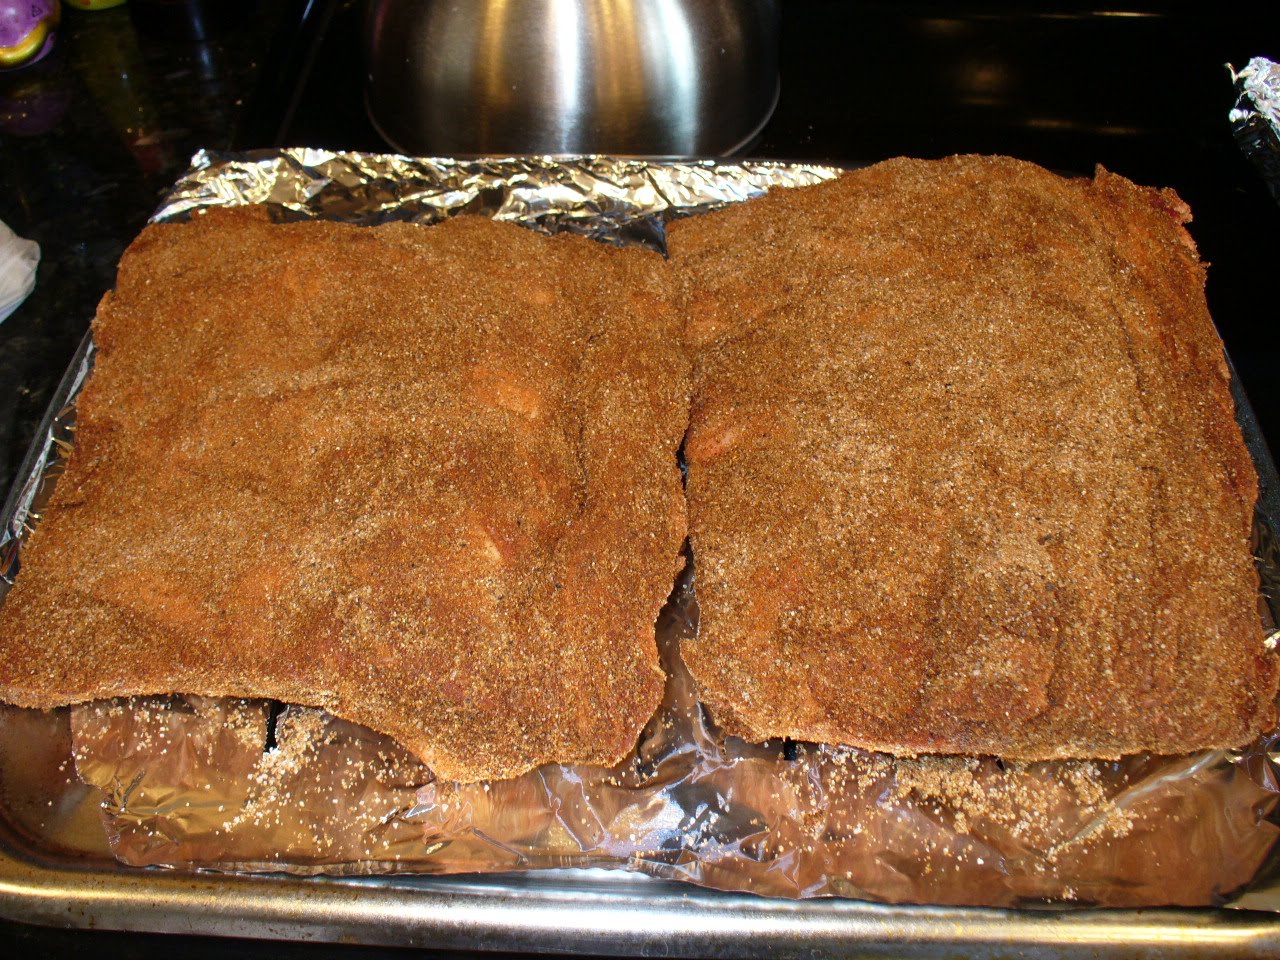
Next take the rub and “rub” it all over the beef ribs. This makes a big mess, with bits of the rub getting everywhere. Just be prepared for it. Make sure to rub the spice mix all over all sides of the ribs and kind of pat it/pack it on there so they get well covered. Like this:


Next stick them on a foil lined baking sheet or broiler pan and put them into a preheated 200 degree oven. Leave them there for 5 hours. This is what is called “low and slow” cooking. Low temperature for a long period of time.

About an hour before the ribs are ready to come out of the oven start working on your sauce ingredients. Peel and mince the ginger, mince the chile peppers, slice the scallions and add those with the remaining sauce ingredients to a saucepan.


Somewhere during this last hour, depending on the type of grill you have, get your briquettes going, or start heating up your gas grill. You want it to be nice and hot.

While the grill is heating up, begin to simmer the sauce ingredients over low heat for about 15 minutes or so, until it starts to thicken.


(My sauce never really “thickened” but it was still good and useable). Once it has thickened, remove from heat and keep warm until ready to use on the grill.

At the 5 hour mark, pull the ribs from the oven and slice them into individual ribs. Put these on your hot grill and cook for about 5-7 minutes per side, or until they are nice and brown.


Baste each side with a portion of the sauce, cooking on the grill for about a minute or so more, until they look nice and glazed.


You should end up with something like this:


Now, before you rush off to cook these, I will give you the recipe for the coleslaw I made to go with them. This is another Cooking Light adaptation.

Coleslaw with Mustard Dressing

1 package premade coleslaw, no dressing
2 Tablespoons white wine vinegar
2 Tablespoons mayonnaise
2 Tablespoons brown style mustard
dash of cayenne pepper
salt and pepper to taste


Now this is how I made it this time. The actual recipe calls for ¼ Cup of white wine vinegar and 2 Tablespoons of sugar. The first time I made this it was quite bitter, so I reduced the vinegar to 2 Tablespoons. That helped a lot. I did not use the sugar either time, but I do feel like the dressing could benefit from a little sweetness to round out the flavor, so next time I will add some sugar, but probably only 1 Tablespoon, if even that much.

Mix the vinegar, mayo, mustard, cayenne, salt and black pepper together in a small bowl. Add the premade coleslaw to a large bowl. Add the dressing and toss to coat. Make this early in the day and stick in the fridge allowing the flavors to blend and mature. Toss again prior to serving.

I also added corn on the cob to our dinner, which is just boil water, add husked corn and boil for about 10 minutes. Drain and serve.

Our delicious Memorial Day barbeque dinner looked like this:


Afterward, Chris looked like this:


His plate looked like this:


These ribs are delicious, with a hint of sweet and a kick of spice. They definitely are a messy food to eat, so be prepared, dig in and enjoy!

Some additional thoughts: We made a half rack of pork ribs at the same time. If I did that again I would cut the amount of kosher salt in the rub by at least half for the pork ribs. They were pretty salty. Also, these ribs could be cooked "low and slow" on a smoker or on an outdoor gas or charcoal barbeque, but would require MUCH more supervision as the temperature would need to be maintained at 200 degrees for the five hour cooking time. I imagine cooking them for the full five hours outdoors would add yet another layer of depth to the flavor.

While these are a bit time intensive, they are very tasty, and even heat up well the next day for leftovers. They are not a terribly unhealthy option as long as you limit your portions. Serving the lighter sides of coleslaw and fresh corn on the cob also helps minimize your calorie consumption. By avoiding the heavier side dishes typical of barbeque, like potato or pasta salad or baked beans, you can still enjoy this dinner, even if you are trying to watch your diet. Remember, it's a celebration! That doesn't mean go hog wild, it means enjoy the moment, enjoy the food, but be reasonable!

This dinner goes great with a nice cold beverage to wash down the spicy kick of the sauce.

Enjoy! If you try these out, let me know what you think!

Happy Summer!

Saturday, May 29, 2010

Summer Dinner Ideas

Summer Dinner

I have heard some really positive feedback from a few people about the recipes and food pictures I have posted. Thank you for that! Your comments and feedback are so great to hear and read; I really appreciate knowing that my creative endeavor, both with this blog and the stuff I post on it, is enjoyed by others.

Because I know you all love food as much as me, this post is about some of the dinners I’ve made lately. Nothing super crazy or exotic, just some good, basic food that turned out delicious.

First: Portobello Mushroom “burgers”


Okay, I know the photo doesn’t really look all that appealing, but trust me, these were quite tasty! I had never made Portobello mushrooms before, so I have to give a shout out to my friend Alison who gave me some tips.

This is what *I* did, so any errors or incorrect procedure is mine completely.

Take two Portobello mushroom caps and clean the gills out of the underside with a spoon. Place the cleaned caps into a bowl with some balsamic vinegar, olive oil, minced garlic and pepper. To that bowl add 1 red/orange/yellow bell pepper (seeds and membrane removed). Toss to coat.

Turn on your broiler to high heat. Place the mushrooms and the peppers on a baking sheet under the broiler for about 5 minutes, flip over and stir around the peppers. Broil for another 3-5 minutes, or until the peppers are starting to char a bit.

The rest of the recipe is adapted from another Cooking Light recipe. I took a thin bun and placed some raw cheddar goat cheese, the mushroom cap and half the peppers on one side and put the other bun on top. Place these back on the baking sheet. Put another heavy pan on top of the “burgers” and kinda smoosh them down. Leave the pan on there (I used another big broiler pan-you could use a cast iron skillet, too) and broil for another few minutes, flipping part way through, until they are heated through, cheese is melty and they look done.

Remove, careful of the hot pans, and ENJOY!!

Second: Marinated Pork Chops


Chris said these might have been the best pork chops he has ever eaten. Well, I don’t know about that, but they were pretty damn tasty. Remember, most of my measurements are approximate. I usually just toss some in there and mix it up. Season to YOUR taste!

2 boneless pork chops
¼ cup balsamic vinegar
2 Tablespoons extra virgin olive oil
¼ teaspoon cracked black pepper
1 teaspoon minced garlic
1 teaspoon minced fresh ginger
3 sprigs fresh thyme
Pinch of dried rosemary

Place all ingredients in a zip top bag, close bag and shake around real good to mix everything up and coat the pork chops. Set aside while you make the rest of your dinner and prepare your grill. Periodically go shake up the bag a bit and flip it over to keep the marinade coating the meat.

We cooked these on the bbq, but you could broil or pan grill them, too. Cook 8-10 minutes per side, depending on thickness of chop and your preference on doneness. Pork should be white throughout and heated to an internal temperature of 160 degrees.

I served this on a bed of red rice, with some crisp steamed green beans and a salad with balsamic vinaigrette dressing.

As I said, Chris loved these, so they might be worth a try!

Third: Barbeque Chicken


This was a pretty tasty dinner, too. If I make it again I might add a little sweetness to the rub, maybe some brown sugar. The bad part about adding any kind of sugar to a rub is that sugar burns very easily on the grill, so adding sugar can be tricky.

Chicken Pieces (I used 4 drumsticks and 2 bone in chicken thighs, but you can use whatever)
1 Tablespoon ground cumin
1 Tablespoon paprika
½ tablespoon garlic powder
1 teaspoon chili powder
Sprinkle of dried sage
Sprinkle of cayenne pepper

Place spices in zip top bag. Add chicken pieces (patted dry if you washed them or they are wet from defrosting-this helps the rub stick). Close bag and shake it around like crazy to coat the chicken pieces. Place the chicken pieces on a hot bbq grill, just off to the side of the heat so they don’t burn. Bone in chicken cooks better over an indirect heat to start with as this allows the chicken to cook through without burning the outside. Cook until the juices run clear. NO pink!

I used a store bought bbq sauce at the very end of cooking time. Take a little less than a tablespoon per piece of meat and mop or baste with the sauce. Cook a bit longer on the grill so the sauce kinda cooks on the chicken. Watch for burning! Most barbeque sauce has sugar in it, which again, burns quickly! After the glaze has kinda set, you are ready to eat!

Using both a rub and a sauce on the chicken gives them a bit deeper flavor seasoning, in my opinion. Otherwise, if you just use a sauce, once you eat the skin off, the rest of the chicken doesn’t have any of that yummy barbeque flavor. A rub helps that flavor permeate the meat a bit more and it sticks to, not only the skin, but the flesh underneath as well.

Of course, barbeque chicken is awesome with any summer side like grilled corn on the cob, baked beans, coleslaw or pasta or potato salad.

I hope you enjoy some of these dinner ideas! Let me know if you try them and how they turn out!

Garden Starts a Growin'


Garden Growin’

The weather the last week or so was very typical spring weather, cool and wet. Now it’s Memorial Day weekend and the skies have cleared, the sun is out and my garden is looking pretty happy!

We went a few days ago and purchased some more starts to plant. The basil and chives we planted with seeds in April never sprouted, neither did most of the acorn squash, and most of Chris’ peppers. So we decided to buy starts of those things and few others to fill up the rest of our boxes.

New additions to the garden: 3 varieties of basil, including lemon basil, chives, some new lettuces, edamame, purple cabbage, another acorn squash start, a whole bunch of pepper varieties, a watermelon, a cantaloupe, and a spaghetti squash. (I think that’s it!)

I planted the edamame in the same box with my corn, so I’m now calling that box the “Monsanto” box, due to evil Monsanto Corp. being the monopolistic producer of genetically modified corn and soy beans. Since my corn and soy are in one box…it’s the “Monsanto” box. ;-)

Everything we planted, with the exception of the watermelon, is looking good. The watermelon looks a little wilty. I hope it perks up. I went and messed with it a bit, but who knows?

I pulled the broccoli as it was just going to flower. We didn’t really get anything from that, I think we planted too late.

I spent some time the other day trimming some of the lettuce, harvesting some lettuce and radishes! Look at those beauties!


I also found a bunch of slugs trying to feast on my radishes and lettuce. So, I went and poked around through the lettuces and radishes and pulled the slugs off. Fun!

The potatoes have gotten huge! I have hilled the dirt up around them and, I guess, we continue to do that until they flower.


The potatoes are a pretty interesting experiment! As another experiment Chris wants to plant some garlic, so I might pick some up at the store this weekend.

We found a couple of nightcrawlers the other day so we tossed those in the garden to help with the soil.

We are not sure how our lemon is doing. A few weeks ago it had a zillion fragrant blooms, and then a bunch of little tiny lemons, but they look kinda black now. Not sure what happened or if that will perk up in the heat or what.

We are really enjoying our garden. We put a couple of chairs out there and spent about an hour out there tonight enjoying the sun, the plants and nice beverage. It is relaxing and peaceful.

As for the harvest, well, I figure we’ll either end up with so much stuff that we will be buried under produce, or we’ll end up with stuff not turning out. It’s a fun process for us anyway.

We are contemplating a few other fruit bearing plants as well, so I’ll keep you updated if we decide to do any of that.

Enjoy a few photos of the boxes just after planting the other day.


Thursday, May 20, 2010

Mead-Part Deux

Mead-Part Deux

Last time I gave you some history of mead, and told you about our initial recipe. We left off with the brew being placed in the initial fermentation container (carboy).

To refresh: the honey, water and yeast are blended together. The yeast feeds on the sugar in the honey, thereby causing fermentation. We did not add any additional nutrient to the mix. Nutrient helps the process go faster.

The brew was started on April 3, 2010. It was off-gassing at a rate of about 12-13 seconds, which means that the vapor lock would have a little bubble pop up every 12-13 seconds. This means that the fermentation process is happening.

After about 5 weeks in the original carboy, Chris decided it was time to transfer the “wort” to a secondary fermentation container (carboy). This carboy is a large glass jug. Sometimes, depending on the process, the wort may need to be transferred multiple times.

Here are some pictures of the process of getting the wort from the white bucket carboy to the clear glass carboy.


The glass carboy is, again, topped with a secure vapor lock to keep air and bacteria out of the mix. The wort has continued off-gassing at about 12-13 second intervals up until the last few days, when it has slowed to about 20 seconds between bubbles. The fermentation process is starting to slow down just a bit, which means it is almost ready for another transfer.

Mead is a brew that takes a long time to make. Unlike beer, which can be done in a few weeks, mead regularly will take several months to a year, to finish fermenting. The longer you leave it the clearer and crisper the color and flavor of the mead. So, we won’t be drinking any of this mead for quite some time.

However, we did take a tiny sample when we were doing the initial transfer. Wow…it was very tasty!